We have learned how to install Windows 7. We have learned how to install Ubuntu. Today, we will learn how to install Windows 7 AND Ubuntu, side by side on the same hard disk, in what is known as a dual boot configuration.
In the Ubuntu installation guide, I have promised you we would do this, so here we are.

What are we going to do?
We are going to do what a typical Windows user would do:We will install Ubuntu on a computer that already has Windows 7 installed. We will have to accommodate space for our Ubuntu installation. To this end, we will use the GParted partitioning tool to resize (shrink) the Windows installation and create new partitions for Ubuntu.
After Ubuntu is installed, we will have to deal with an error - a typical case of unbootable Windows, a common problem that can occur when the Windows installation is changed. We will learn how to deal with this problem simply and efficiently using the built-in tools, fixing the Windows boot issue.
In the end, we will have the two operating systems installed side by side in a dual boot configuration, both working happily.
This tutorial is critical for any Windows user considering running Linux alongside his/her installation. Not only will it teach the user how to interpret the hard disk layout and change it safely and smartly, it will also expose the user to a seemingly catastrophic boot failure, which we will solve. This exercise in dual-booting is as real as it can get.
Follow me.
Preliminary reading
To be able to fully enjoy this tutorial and follow all its minute details, you must invest some time in reading older material, on which this guide is based. Lots of technical lingo in this tutorial references to detailed, step-by-step instructions presented in the dedicated Windows 7 and Ubuntu installation guides, as well as additional tutorials.Please do not skip this section. While you can use this guide without any external help, you will greatly benefit from studying the other articles. They will teach you the vital, fundamental basics in operating system installations, disk management and boot loading procedure.
Windows 7 installation guide
Ubuntu installation guide
GParted partitioning software - Full tutorial
GRUB bootloader - Full tutorial
Dual booting - Windows & Linux (based on Windows XP & Kubuntu)
Now, let us begin.
Scenario: Windows 7 is installed
This is the classic case. A Windows user, who has already installed Windows on his/her machine would like to try Linux. The user has heard of Ubuntu, which comes as no surprise, since it is the most popular Linux distribution available.The user downloads the Ubuntu live CD image, burns it to CD - and the fun begins.
Things to consider before trying Linux
Windows users need to consider carefully the pros and cons of testing a new operating system on their hardware. Please go through the following list and see if any of the issues mentioned might be of concern for you. There might be hardware issues
Linux distributions have good hardware support in general, but there's no such thing as perfect. You may be the unlucky person whose hardware is incompatible with this or that edition of this or that Linux distribution. This can cause problems in getting the operating system to boot or you might have to deal with missing drivers after the installation. The same holds true for Windows, but Windows usually comes preinstalled and you get a load of drivers when you buy a new computer.
Keep this in mind before venturing into uncharted territories.
Windows and Linux are different
Windows users have a notion of how things work based on their former experience with computers, mostly revolving around one or more Windows releases. The Linux operating system is different. Mastering it takes time and patience. Do not expect to become experts overnight or be able to solve all your problems early on. At all times, you must remember that the two operating systems are different, they behave and act differently. Data loss
Whenever you're about to change the existing installation, there's a risk of data loss, regardless of which operating system you're about to install. It is important to make sure you have your critical data backed up to external media. You should also verify that your backups are intact and that they can be restored. Therefore, to install Windows and Linux together, you need to be confident your data is safely backed up and you need to understand that there might be hardware issues with your installation. Likewise, the methodology to solving the problems will differ from you're used to in Windows. As long as you keep these things in mind, your dual-boot experience will be a pleasant one.
Boot into Ubuntu live CD session
Very fortunately, Ubuntu (as many other Linux distros) comes as a bootable live CD. This means you can boot Ubuntu and test the hardware compatibility, without making any changes to your existing installations on the hard disk. This is an excellent feature that lets you play with the operating system, get the first impression, check different applications, and make sure all your hardware is properly detected.This is what we will do. Boot into live CD, make sure everything works, then proceed with the installation. Following the instructions in the Ubuntu installation guide should have you logged into the Ubuntu live session in the matter of minutes:

Make sure your wired and Wireless network adapters are functioning, make sure your Bluetooth, Web camera, sound card, and possibly the graphics card all work as expected. This is the first step to ensuring smooth and painless installation and post-install experience. If you need guidance how to test all these, please refer to any one of my Linux distro reviews, including Ubuntu 8.10 and Ubuntu 9.04 in particular.
Once you're sure everything is ready, you can begin the installation.
Truth to be told, you should NOT start the installation immediately, but we will do this anyway. I want to show you how an average user might act and follow his/her train of thought.
Please note, it is okay to start the installation, but there is an ever better and smarter way to approach the task. We will soon learn why and how. For now, let's double-click on the Install button.
This will begin the Ubuntu installation.

Prepare Disk Space (Partitioning)
The most important step of the installation is Step 4: Prepare Disk Space. In technical terms, this is called partitioning.
Let us first examine the current situation:
Windows 7 is installed
Ubuntu wisely informs you that This computer has Windows Vista (loader) on it. Good. This means that Ubuntu recognizes the existing installation.Do not be confused about the Windows Vista terminology. Windows Vista and Windows 7 use the same bootloader, hence the "erroneous" notation. This will definitely change in the coming version of Ubuntu.
Take a look at the existing layout. There's a small, 100MB Windows system partition present and another 13.6GB partition in use, plus some free space. If you recall the Windows 7 installation, these are exactly the partitions we created, both primary!

We now know that we should not touch or alert the small Windows system partition, but we might be able to resize (shrink) the big NTFS partition in order to accommodate more space for Ubuntu. So far so good.
Let's see what else the installer offers us:
The default installation choice is to install Windows and Ubuntu side by side. Good. This is what we want. Ubuntu even suggests its own recommended layout.
While it looks quite OK, I do not think you should accept it. I think that partitioning is too important to leave in the hands of an automated installer. This is a task that you need to do manually, carefully examining each and every step.
So we should choose the third option, Specify partitions manually (advanced).

Now, we need to manually edit the partitions.

Planning is everything
Before you make any change, let's examine the image above some more.Again, it's the same thing from before, only shown in the table form rather than as a graph ribbon. We have two partitions on the disk, sda1 and sda2, both primary, both formatted as NTFS. There's also some free space. What more, sda2 is also quite free, with less than half occupied by Windows 7 files.
We have several options:
Install Ubuntu into the free space
This is the simplest choice. We will have to create the Extended partition and then create three logical partitions inside it, one for the root filesystem, one for home and one for swap. The 6.3GB free space is enough for a Ubuntu installation. Note: On a production system, the free space might have been occupied by one or more existing partition, maybe a FAT32 or NTFS partition used for data in Windows or maybe a previous Linux installation. Whichever the case, you need to KNOW what's there, correctly match data seen in Windows to what you see in the installer and make your choice.
Shrink Windows and create a new layout
This is also an option, somewhat more complex. Let's say we want more than the free space we have. This means we will have to make the Windows sda2 partition smaller. Luckily, this can be done, because the partition is quite large and mostly unused. We will go for option (b), both because it is harder and because it more closely resembles reality, where most people do not plan ahead and have to work around the limitations of their installations.
Which brings me to the most important thing of all: planning is everything.
Plan ahead, two, three, five years. It's not easy or always possible, but it's a must for flexible, carefree computing. You need to think ahead and make sure your setup will be valid many years into the future.
What am I trying to tell you?
Before you install any operating system, think, think, think! Is this going to be a dual-boot system? Will you be installing more than one operating system? If so, make sure you create a smart partition layout in advance and dedicate partitions to each instance. Not only does this make more sense, it is safer. You won't have to fiddle with existing partitions containing important data. You will be instantly ready for new installations, with partitions waiting for you.
Recommendation:
If you're going to create dual-boot layouts on your machines, then here are some golden rules that should serve you well. - Create partitions using a dedicated partitioning tool like GParted.
- Windows needs to be installed into primary partitions. Windows 7 requires that its system partition be primary. The second partition can be logical, meaning it can be placed into the Extended partition.
- Create partitions large enough so you won't need to enlarge them.
- Create separate data partition for Windows files and another for data.
- Create separate Linux root and home partitions.
- Possibly create a partition for sharing of data between Windows and Linux.
Example:
Here's the layout I would make. Let's assume a 100GB disk, so we can relate to partition sizes in relative terms (percentage). I will also use generic /dev/sdaX names for the partitions. - Windows 7 system partition - 1GB (sda1)
- Extended partition - 99GB (sda2)
- Windows partition (Windows files) - 20GB (sda5)
- Windows data partition (user files) - 60GB (sda6); you can share it in Linux
- Linux root - 10GB (sda7)
- Linux swap - RAM size, let's assume 2GB (sda8)
- Linux home - remaining space (sda9)
Can we use this recommended setup in our case?
The answer is: no. We did not create the partitions using a third-party tool like GParted. We created the partitions using Windows 7 installer. Unfortunately, Windows 7 creates all new partitions as primary. Here's a reminder:

So, we will have to handle the situation a little differently.
We still need three partitions for Linux (root, swap, home). There are already two partitions in use by Windows. There can only be a total of four primary partitions on any hard disk. This means we must create the Extended partition in the free space, including the extra space gained by Windows 7 partition shrinking, otherwise we must forgo either the use of separate swap or home in Ubuntu. If push comes to shove, Ubuntu can manage with just one partition, but this is not recommended.
- Resize Windows partition (sda2).
- Create Extended partition - will be called sda3.
- Create logical partitions (root, swap, home) inside the Extended - will be called sda5, sda6 and sda7.
Edit partition
Our first task is to edit sda2:
Stop!
Remember the recommendation to use a dedicated partitioning tool? This is what we're going to do. We're going to close the installer and use GParted. We know what we need, the only thing left is to use the right tool for the right job - GParted.Use GParted to create partition layout
GParted comes with Ubuntu. It can be found under System > Administration > Partition Editor.
OK, let's make sure we have everything we want and need:
- Windows 7 data is backed up, check.
- We will resize (shrink) Windows 7 partition (sda2).
- We will create the Extended partition.
- We will create logical partitions.
- We will then resume the Ubuntu installation.
Resize (Shrink) Windows NTFS partition
If you've read my extensive GParted tutorial, you know how to do this. It's rather simple. Highlight the partition and click on Resize/Move in the icon menu.
Choose the new size. We'll lake it smaller by some 2GB.

Once you approve of the new size, click Resize/Move. Nothing will happen yet. GParted will write down the task, but it will not run it until you click Apply in the main icon menu. This is a good thing, as it lets you make new changes and cancel tasks.

Create Extended partition
The next step is to create the Extended partition that will span the entire free space, including the new 2GB freed from Windows.
Create Linux partitions
Next, we will create the root, swap and home for Ubuntu. We'll format the root and home with Ext4 filesystem. Please refer to the Ubuntu installation guide for more details.


Final layout
This is the final layout:
Apply the changes
Triple check the layout, make sure you've done everything as you planned. Once you're fully satisfied, click Apply and let the tool run.GParted will start working. It will first run the shrinking task.
GParted is quite friendly. GParted will first run a simulation to make sure it can do the desired task. Then, it will run a consistency check on the NTFS partition and try to fix errors if it finds any, it will then resize the partition and copy all the data over. Depending on the chosen sizes and the disk speed, this can take many hours.


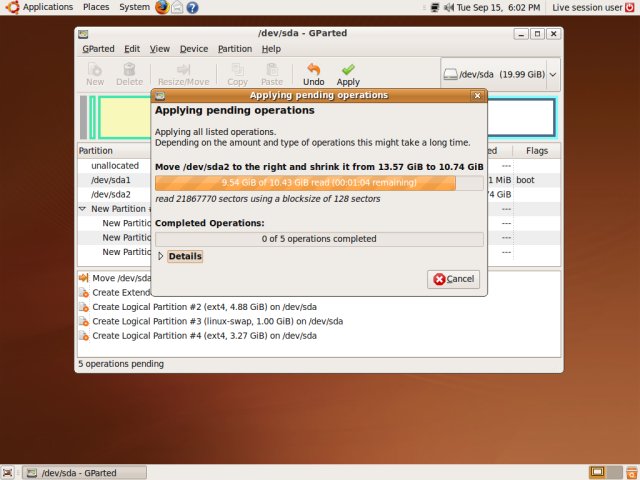

Next, it will create the Linux partitions.
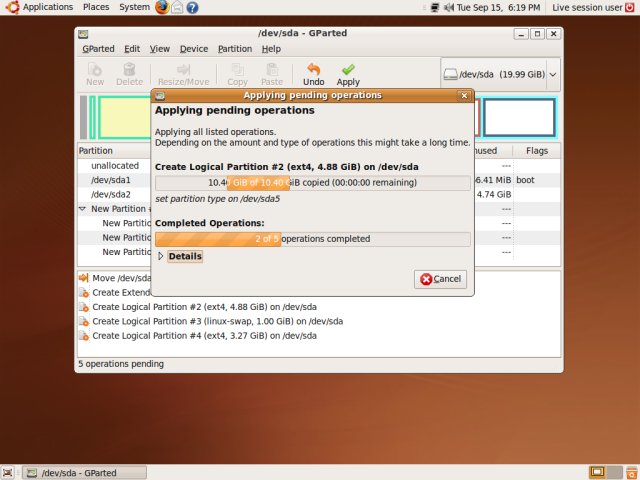
Success!
If everything went as expected, GParted will complete all of the task successfully. However, please note there is no guarantee that you will succeed. Your disk may be damaged or there might be irreparable errors with the filesystem you're working on. What more, GParted might not be able to resize Windows partitions. Remember, partitioning is a very delicate procedure. It may (and should) work. Then again, in a few cases, it may and will fail. You must be aware of this.
Luckily, we had no problems.

New layout
And here's the desired layout:
Now we can go back and resume the installation.
Resume installation
We will close GParted and click on the Install icon once again. In Step 4, we will now be seeing a whole new layout:
Again, we will use the third option (Specify partitions manually). Ubuntu recommends yet another shrinking of the Windows 7 partition, but it is not necessary. We have all we need. We will not manually assign mountpoints to our freshly created root, swap and home partitions.

Highlight the partitions (sda5-7) and assign them relevant mount points. There's no need to format them again, because we just did that with GParted.

Here's the final setup:

Warning
The installer will warn you that you're not formatting the root filesystem and that it's going to destroy any existing directories found there. Since we know we've just created the partitions and want to use them for our new Ubuntu installation, this is ok. 
Our installation is ready.

But there's one more thing to configure.
Configure bootloader
Ubuntu informed us that sda1 contains Vista (loader) on it. This is expected. Every operating system must use some form of bootloader to start.When you're running a dual boot system, you will have two options, using either the Windows bootloader or GRUB, which is the default loader in most Linux distros, including Ubuntu.
This is a standard procedure in dual boot systems.

The default setting is to install the bootloader, so you need not do anything.
We're ready. Click Install and let the procedure complete.
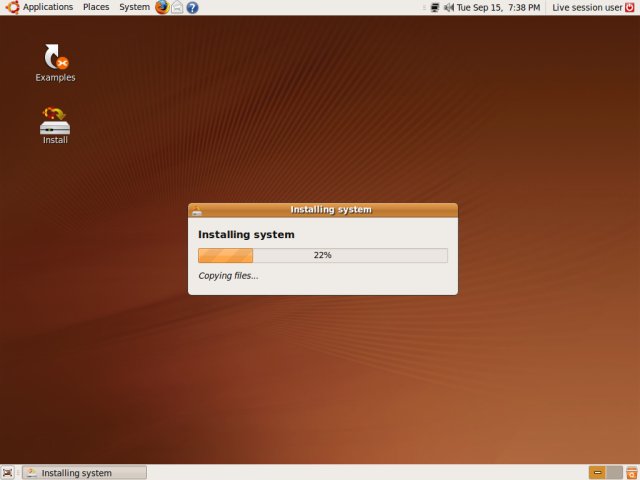
Installation complete, enjoy your dual-boot
After you reboot the system following Ubuntu installation, you will now see the GRUB menu, showing entries for both Linux and Windows, just as we've expected. This is very similar to what we've seen with Windows XP and Kubuntu.Notice the "erroneous" Windows Vista entry. No matter, we can change it. See GRUB tutorial for more details.

Boot Ubuntu
Let's first boot Ubuntu. Indeed, everything works fine.Let's make some more checks. For example, if you go to Place, you can see the Windows partitions in the list, called System Reserved and 11.5GB Media.

And here are the contents of the 11.5GB drive:

Now, let's boot Windows.
Boot Windows
Oops, we get this horrible error!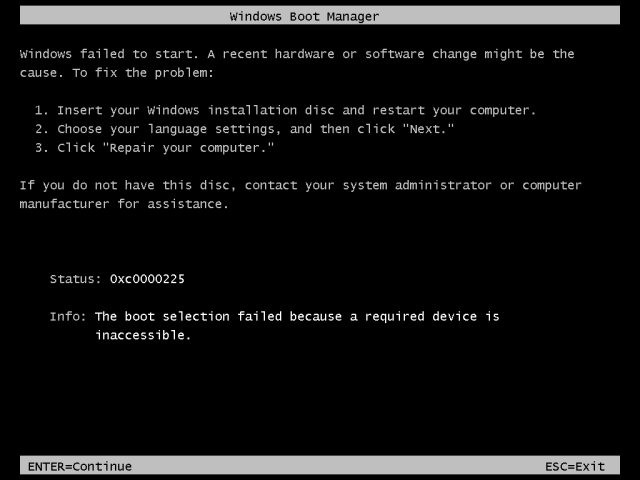
This is exactly what I wanted you to see! Don't panic!
Whenever you use a partitioning tool against an installed system, there's a chance of a problem, filesystem corruption and who knows what else. There is no guarantee for success. Re-partitioning of installed operating systems is risky. This is why you should always create your setup BEFORE installations, so you never have to face this kind of problem.
What went wrong?
Well, my guess is the resizing (shrinking) messed up the filesystem. No worries, we will fix it. Luckily, we can solve this one rather easily. The error message itself suggests the course of action - boot from Windows installation disc, choose Language settings, click on Repair your computer and let the built-in Windows tools do the job. Let's do it, then. Repair unbootable Windows installation
Following the instructions, we will boot from the Windows installation disc.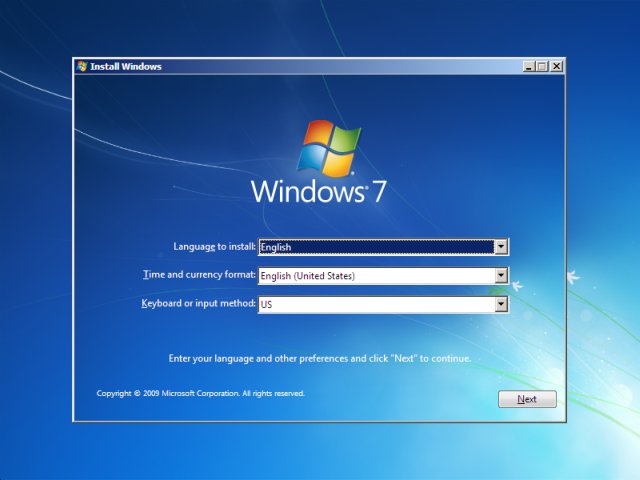
Click on Repair your computer:

And you will see this menu:
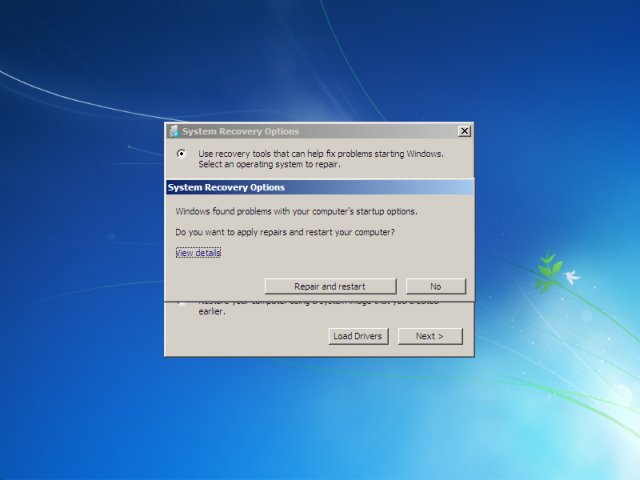
Let Windows repair itself. It should do a pretty good job.
Indeed, we're up and running. Windows 7 will start booting and recommend you run checkdisk against your disk, offering yet another hint that the resizing procedure messed things up a little. You should indeed let the tool run.


And soon, you'll see the login menu:

And here we can see the changes in My Computer and the Disk Management.

One thing that Windows 7 does not report correctly are the partition types for our Linux partitions. It reports all of them as primary, for a total of five on the same disk! Impossible! But this is a small glitch overall.

Other Windows repair & recovery tools
In case the automated Windows 7 self-repair does not work, you can use additional tools available via the Recovery console. In addition to Startup Repair, you can also try System Restore, Image Recovery, and even check the Memory.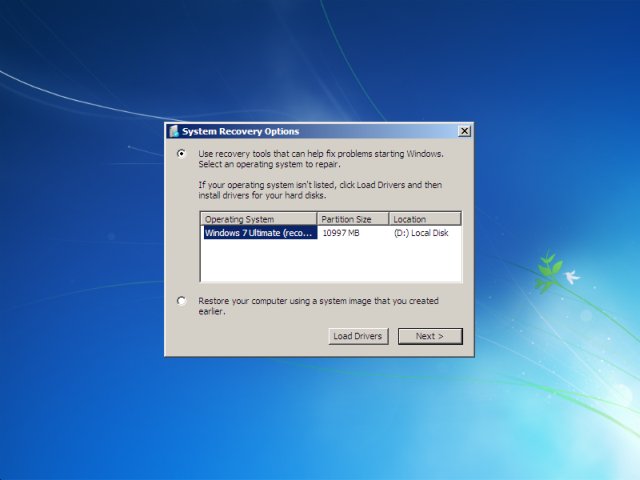

Congratulations!
That's it, we're done!We have our dual-boot system running. Windows 7 and Ubuntu are installed side by side. Everything works as expected. We've even had to deal with a serious boot issue in Windows, but we managed it quite well. This is a very important lesson.
Conclusion
Dual booting Windows 7 and Ubuntu is not a simple task. It requires attention to details and patience. And there is no guarantee that it will work.However, if you follow the instructions carefully and invest time planning your setup, you will enjoy a pleasant, problem-free experience of running two or more operating systems side by side. What more, even if you do encounter errors, you have the right knowledge and tools to solve them easily.
Hopefully, this tutorial has provided you with the crucial knowledge and real-life examples to configuring a complex, useful dual boot system. We will visit the concept of dual booting once again when openSUSE 11.2 is launched. In addition to the standard installation guide for openSUSE, we will again setup a dual boot system.
Cheers.
No comments:
Post a Comment